Internal peripherals.
Now you know the basics of peripherals, lets see what peripherals are available in ATmega16 MCU.- Two 8-bit Timer/Counters with Separate Prescalers and Compare Modes
- One 16-bit Timer/Counter with Separate Prescaler, Compare Mode, and Capture Mode
- Real Time Counter with Separate Oscillator
- Four PWM Channels
- 8-channel, 10-bit ADC 8 Single-ended Channels 7 Differential Channels in TQFP Package Only 2 Differential Channels with Programmable Gain at 1x, 10x, or 200x
- Byte-oriented Two-wire Serial Interface
- Programmable Serial USART
- Master/Slave SPI Serial Interface
- Programmable Watchdog Timer with Separate On-chip Oscillator
- On-chip Analog Comparator
Interfacing Technique.
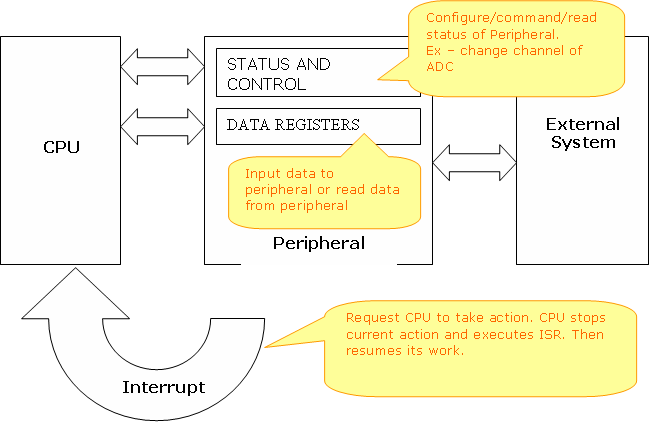 |
Fig: Using internal peripherals of AVR MCUs. |
1)Data registers – which usually contains some data, say byte received from USART or data just read from internal EEPROM.
2)STATUS and CONTROL register – these are used to configure the peripheral according to your need, and to control them from your program. For example the ADMUX register has following bits.
Bit No.
|
7
|
6
|
5
|
4
|
3
|
2
|
1
|
0
|
| Name | REFS1 | REFS0 | ADLAR | MUX4 | MUX3 | MUX2 | MUX1 | MUX0 |
Interrupts.
As we saw the you can use the STATUS registers to see the what the peripheral has to say to the CPU, like it has just completed the conversion Analog value to digital and the data is ready. But in this way you have to constantly poll the registers. But one more advance feature is INTERRUPTs. Where the peripheral halts the CPU whenever it has something interesting. Then the CPU will jumps to a function called ISR (interrupt service routine) which is provided by you. You can configure which events should interrupt the CPU and also provide the ISR.Steps to use peripherals.
- First setup the peripheral according to your need.
- Set interrupts and ISRs (Optional)(beginners may skip for simplicity).
- Command the peripheral or read / write data.