Like many microcontrollers AVR also has a dedicated hardware for serial communication this part is called the USART - Universal Synchronous Asynchronous Receiver Transmitter. This special hardware make your life as programmer easier. You just have to supply the data you need to transmit and it will do the rest. As you saw serial communication occurs at standard speeds of 9600,19200 bps etc and this speeds are slow compared to the AVR CPUs speed. The advantage of hardware USART is that you just need to write the data to one of the registers of USART and your done, you are free to do other things while USART is transmitting the byte.
Also the USART automatically senses the start of transmission of RX line and then inputs the whole byte and when it has the byte it informs you(CPU) to read that data from one of its registers.
The USART of AVR is very versatile and can be setup for various different mode as required by your application. In this tutorial I will show you how to configure the USART in a most common configuration and simply send and receive data. Later on I will give you my library of USART that can further ease you work. It will be little complicated (but more useful) as it will have a FIFO buffer and will use interrupt to buffer incoming data so that you are free to anything in your main() code and read the data only when you need. All data is stored into a nice FIFO(first in first out queue) in the RAM by the ISR.
USART of AVR Microcontrollers.
The USART of the AVR is connected to the CPU by the following six registers.- UDR - USART Data Register : Actually this is not one but two register but when you read it you will get the data stored in receive buffer and when you write data to it goes into the transmitters buffer. This important to remember it.
- UCSRA - USART Control and status Register A : As the name suggests it is used to configure the USART and it also stores some status about the USART. There are two more of this kind the UCSRB and UCSRC.
- UBRRH and UBRRH : This is the USART Baud rate register, it is 16BIT wide so UBRRH is the High Byte and UBRRL is Low byte. But as we are using C language it is directly available as UBRR and compiler manages the 16BIT access.
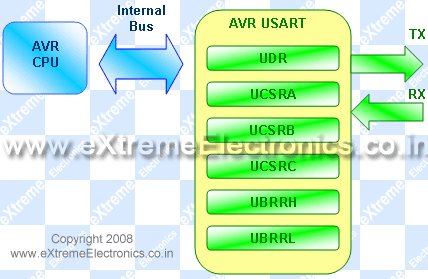 |
Fig- AVR USART registers. |
Registers Explained
In order to write programs that uses the USART you need to understand what each register's importance. The scheme behind using the AVR USART is same as with any other internal peripheral (say ADC). So if you are new to this topic please see this tutorial, it shows you the basic idea of using peripherals.I am not going to repeat what is already there in the datasheets, I will just tell about what is required for a quick startup. The datasheets of AVR provides you with all the details of every bit of every register so please refer to it for detailed info. Note bit names with RED background are of our interest here.
UDR: Explained above.
UCSRA: USART Control and Status Register A
*****************************************
Bit No
|
7
|
6
|
5
|
4
|
3
|
2
|
1
|
0
|
Name
|
RXC
|
TXC
|
UDRE
|
FE
|
DOR
|
PE
|
U2X
|
MPCM
|
Initial Val
|
0
|
0
|
1
|
0
|
0
|
0
|
0
|
0
|
TXC This bit is set (1) when the USART has completed transmitting a byte to the host and your program can write new data to USART via UDR
UCSRB: USART Control and Status Register B
*****************************************
Bit No
|
7
|
6
|
5
|
4
|
3
|
2
|
1
|
0
|
Name
|
RXCIE
|
TXCIE
|
UDRIE
|
RXEN
|
TXEN
|
UCSZ2
|
RXB8
|
TXB8
|
Initial Val
|
0
|
0
|
0
|
0
|
0
|
0
|
0
|
0
|
TXCIE: Transmit Complete Interrupt Enable - When this bit is written one the the associated interrupt is enabled.
RXEN: Receiver Enable - When you write this bit to 1 the USART receiver is enabled. The normal port functionality of RX pin will be overridden. So you see that the associated I/O pin now switch to its secondary function,i.e. RX for USART.
TXEN: Transmitter Enable - As the name says!
UCSZ2: USART Character Size - Discussed later.
For our first example we won't be using interrupts so we set UCSRB as follows
UCSRB=(1<<RXEN)|(1<<TXEN);
UCSRC: USART Control And Status Register C
*****************************************
Bit No
|
7
|
6
|
5
|
4
|
3
|
2
|
1
|
0
|
Name
|
URSEL
|
UMSEL
|
UPM1
|
UPM0
|
USBS
|
UCSZ1
|
UCSZ0
|
UCPOL
|
Initial Val
|
0
|
0
|
0
|
0
|
0
|
0
|
0
|
0
|
URSEL: USART register select.
UMSEL: USART Mode Select - This bit selects between asynchronous and synchronous mode. As asynchronous mode is more popular with USART we will be using that.
UMSEL
|
Mode
|
0
|
Asynchronous
|
1
|
Synchronous
|
USBS
|
Stop Bit(s)
|
0
|
1 BIT
|
1
|
2 BIT
|
UCSZ2
|
UCSZ1
|
UCSZ0
|
Character Size
|
0
|
0
|
0
|
5Bit
|
0
|
0
|
1
|
6Bit
|
0
|
1
|
0
|
7Bit
|
0
|
1
|
1
|
8Bit
|
1
|
0
|
0
|
Reserved
|
1
|
0
|
1
|
Reserved
|
1
|
1
|
0
|
Reserved
|
1
|
1
|
1
|
9Bit
|
UCSRC=(1<<URSEL)|(3<<UCSZ0);UBRR: USART Baud Rate Register:
*********************************
This is the USART Baud rate register, it is 16BIT wide so UBRRH is the High Byte and UBRRL is Low byte. But as we are using C language it is directly available as UBRR and compiler manages the 16BIT access. This register is used by the USART to generate the data transmission at specified speed (say 9600Bps). To know about baud rate see the previous tutorial. UBRR value is calculated according to following formula.
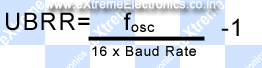
Where fosc is your CPU frequency say 16MHz
Baud Rate is the required communication speed say 19200 bps (see previous tutorial for more info).
Example:
For above configuration our UBRR value comes to be 51.083 so we have to set
UBRR=51;in our initialization section. Note UBRR can hold only integer value. So it is better to use the baud rates that give UBRR value that are purely integer or very close to it. So if your UBRR value comes to be 7.68 and you decided to use UBRR=8 then it has high error percentage, and communication is unreliable!
Initialization of USART
Before using the USART it must be initialized properly according to need. Having the knowledge of RS232 communication and Internal USART of AVR you can do that easily. We will create a function that will initialize the USART for us.
#include <avr/io.h>
#include <inttypes.h>

void USARTInit(uint16_t ubrr_value)
{

   //Set Baud rate
   UBRR= ubrr_value;

   /*Set Frame Format


   >> Asynchronous mode
   >> No Parity
   >> 1 StopBit
   >> char size 8

   */

   UCSRC=(1<<URSEL)|(3<<UCSZ0);


   //Enable The receiver and transmitter
   UCSRB=(1<<RXEN)|(1<<TXEN);


}
That's it for now friends. In next tutorial we will learn how to send and receive data over RS232 channel. Don't forget to post your opinion or doubts or any suggestion I would be very happy to see them. So don't wait post a comment now !