What is a timer ?
A timer in simplest term is a register. Timers generally have a resolution of 8 or 16 Bits. So a 8 bit timer is 8Bits wide so capable of holding value withing 0-255. But this register has a magical property ! Its value increases/decreases automatically at a predefined rate (supplied by user). This is the timer clock. And this operation does not need CPU’s intervention.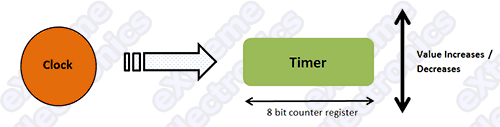 |
Fig.: Basic Operation Of a Timer. |
 |
Fig.: Basic Operation Of a Timer. |
Using The 8 BIT Timer (TIMER0)
The ATmega16 and ATmega32 has three different timers of which the simplest is TIMER0. Its resolution is 8 BIT i.e. it can count from 0 to 255. Note: Please read the “Internal Peripherals of AVRs” to have the basic knowledge of techniques used for using the OnChip peripherals(Like timer !) The Prescaler The Prescaler is a mechanism for generating clock for timer by the CPU clock. As you know that CPU has a clock source such as a external crystal of internal oscillator. Normally these have the frequency like 1 MHz,8 MHz, 12 MHz or 16MHz(MAX). The Prescaler is used to divide this clock frequency and produce a clock for TIMER. The Prescaler can be used to get the following clock for timer. No Clock (Timer Stop). No Prescaling (Clock = FCPU) FCPU/8 FCPU/64 FCPU/256 FCPU/1024 Timer can also be externally clocked but I am leaving it for now for simplicity.TIMER0 Registers.
As you may be knowing from the article “Internal Peripherals of AVRs” every peripheral is connected with CPU from a set of registers used to communicate with it. The registers of TIMERs are given below.TCCR0 – Timer Counter Control Register. This will be used to configure the timer.
Fig.: TCCR0 - Timer Counter Control Register 0 |

TCNT0 – Timer Counter 0
Timer Interrup Mask Register TIMSK
This register is used to activate/deactivate interrupts related with timers. This register controls the interrupts of all the three timers. The last two bits (BIT 1 and BIT 0) Controls the interrupts of TIMER0. TIMER0 has two interrupts but in this article I will tell you only about one(second one for next tutorial). TOIE0 : This bit when set to “1” enables the OVERFLOW interrupt. Now time for some practical codes !!! We will set up timer to at a Prescaler of 1024 and our FCPU is 16MHz. We will increment a variable “count” at every interrupt(OVERFLOW) if count reaches 61 we will toggle PORTC0 which is connected to LED and reset “count= 0”. Clock input of TIMER0 = 16MHz/1024 = 15625 Hz Frequency of Overflow = 15625 /256 = 61.0352 Hz if we increment a variable “count” every Overflow when “count reach 61” approx one second has elapse.
Setting Up the TIMER0
  // Prescaler = FCPU/1024
   TCCR0|=(1<<CS02)|(1<<CS00);
 //Enable Overflow Interrupt Enable
   TIMSK|=(1<<TOIE0);
 //Initialize Counter
   TCNT0=0;
Now the timer is set and firing Overflow interrupts at 61.0352 Hz
The ISR
ISR(TIMER0_OVF_vect)
{
//This is the interrupt service routine for TIMER0 OVERFLOW Interrupt.
//CPU automatically call this when TIMER0 overflows.

//Increment our variable

   count++;
   if(count==61)
   {
   PORTC=~PORTC; //Invert the Value of PORTC
   count=0;
   }
}
Demo Program (AVR GCC)
Blink LED @ 0.5 Hz on PORTC[3,2,1,0]
#include <avr/io.h>
#include <avr/interrupt.h>

volatile uint8_t count;

void main()
{
   // Prescaler = FCPU/1024
   TCCR0|=(1<<CS02)|(1<<CS00);

   //Enable Overflow Interrupt Enable
   TIMSK|=(1<<TOIE0);

   //Initialize Counter
   TCNT0=0;

   //Initialize our varriable
   count=0;

   //Port C[3,2,1,0] as out put
   DDRC|=0x0F;

   //Enable Global Interrupts
   sei();

   //Infinite loop
   while(1);
}

ISR(TIMER0_OVF_vect)
{
   //This is the interrupt service routine for TIMER0 OVERFLOW Interrupt.
   //CPU automatically call this when TIMER0 overflows.

   //Increment our variable
   count++;
   if(count==61)
   {
      PORTC=~PORTC; //Invert the Value of PORTC
      count=0;
   }
}